How to design product labels
Let’s talk labels. The kind that distinguishes a product from the rest of the crowd on supermarket shelves and helps the brand stick in customers’ minds long after their grocery shopping trip. These tips and tricks help ensure that your next product label design shines.

by green in blue
Talk to your client
The first step in any design process is to talk to your client. They know what they want and may provide a label template to use.
Here's what a label template might look like:
Here's what a label template might look like:

Ensure your client has the following before proceeding with your design:
- The company logo
- Product detail: Check to see if the details provided tell you what the product is, who is likely to buy it, and why. Your client should also tell you if this product is part of a series with an established design style.
- Required file types and dimensions: Some clients will provide this information. If they don't, you could ask to connect directly with the printer.
- Type of packaging: This will help determine whether you need to create a front and back label (eg. cereal box), or a label that runs around (eg. beer bottle).
- The copy (text)
- Branding guidelines: Not all clients have this, but ask if they do, so you can follow guidelines.
- Preferences: Most clients have preferences for the look and feel of the label, from shapes (square, oval, etc.) to colors. Make the most of your design time and get a clear idea from the start.
Anatomy of a label design
Like with any printable design, a product label must have the three main components: trim line, bleed area and safety line.
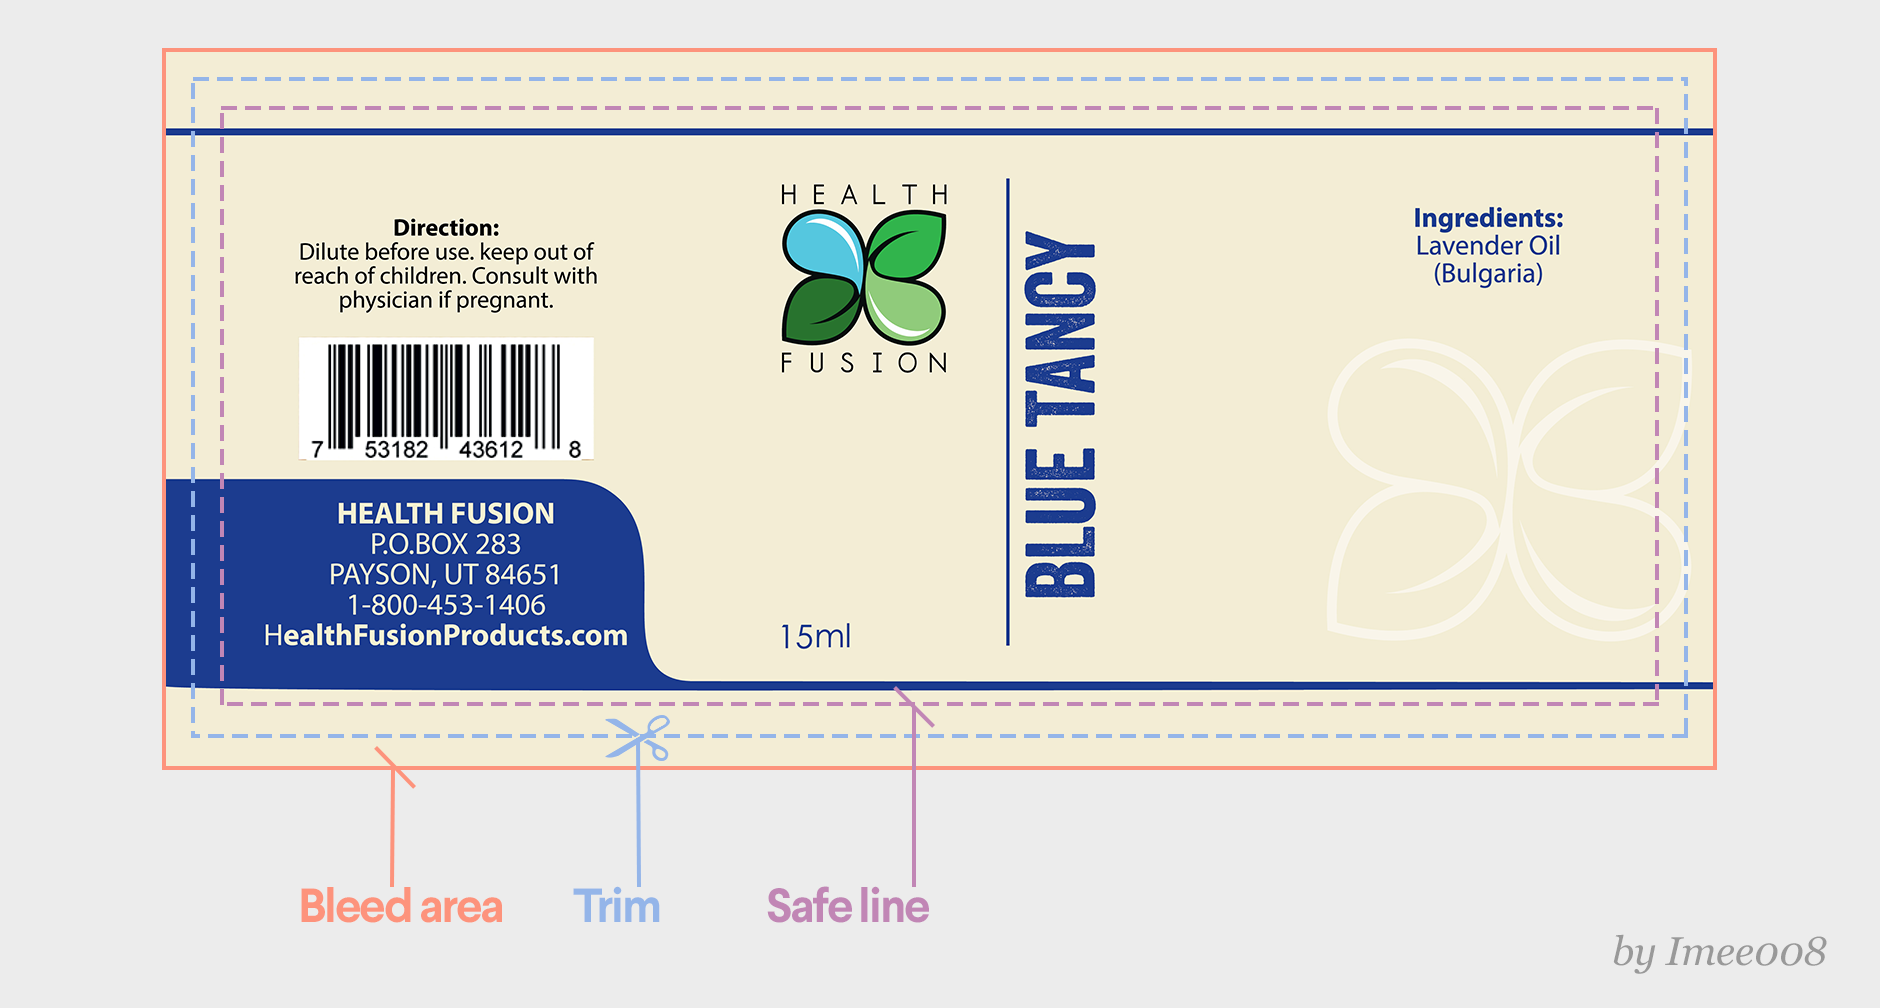
All content of your label design should sit well within the safety line.
The trim line is where the printer cuts your label design. The bleed area is anything that lies beyond the trim line. Extend artwork to this area to avoid unwanted gaps in your final label design
The trim line is where the printer cuts your label design. The bleed area is anything that lies beyond the trim line. Extend artwork to this area to avoid unwanted gaps in your final label design
What’s included in a typical label design?

- Ingredients
- Certifications
- Best before date
- Serving suggestions or recipes
Barcode

Barcodes are the machine-readable lines on a package that stores information about a product. There are two types:
- UPC: Universal Product Code, the predominant barcode in North America
- EAN: International Article Number, a global barcode
You’re almost there
Congratulations, you’ve finished your product label design! What are the important things to check before you hand off your awesome design to your client?
The post-design checklist
- Show your design in its real-life setting: Imagine the way your label design will look in places it is intended for—think about how it will look on the supermarket shelf and in customer homes. Will it stand out or will it blend in with the other products?
- It’s all in the details: Triple check that you have all the important design elements included in the label. As the designer, you are legally required to do so. If the product is organic (and your client has provided the proof it is so), then you need to include the “organic” certification in your label.
- Get organized, your client will thank you for it: For the handover, make sure you organize your files in a way that’s easy for the client to use. If you are providing label designs for different packaging, save them separately and name clearly to avoid confusion.

Handover
Once your client has approved the final design, send them all of the design files. Here’s what they need:
- An editable version of the final design (AI, PSD, PDF, or EPS)
- All web preview images (JPEG or PNG)
- A link to purchase any commercial fonts used in the design
Dictionary of design
Here are the useful methodologies and printing terms you need to know.
Color mode
CMYK and RGB... come again? Don’t worry, there are two main color modes you need to worry about and their differences are laid out as below.
- CMYK: An ink-based mode used in print
- RGB: A light-based mode used for digital and web design
-
 by Sign²in
 -
by T6S


Image resolution
Resolution is the amount of pixel detail in an image. When designing your label, you should save it at a higher resolution. 300dpi is recommended.
- High resolution: Many pixels make the image sharp
- Low resolution: Few pixels make the image pixelated


Type of materials
It’s important to figure out what the substrate / type of materials your label design will be printed on.- Films or foils: a thin flexible strip made of plastic or metal
- Release liner: paper or plastic-based film sheet applied during the manufacturing process used to prevent a sticky surface from prematurely adhering
- Textiles: a flexible material consisting of a network of natural or artificial fibres (yarn or thread)
- Paper: the different types of paper to consider may be lightweight, heavyweight, coated, uncoated, paperboard or cardboard
- Parchment: a material made from processed animal skin and used for writing on
Printing techniques
How your design is printed.
- 4-color offset: A full color printing process for large volume printing
- Digital printing: Great for small runs and short turnaround times
- Foil ink: Specialty process that uses metallic foil rather than ink
- Spot color: Color generated by an ink (pure or mixed) printed using a single run.
-
by Martis Lupus
-
by Mj.vass
-
by Wooden Horse
-
by arquimedia


Finishes
The final touches made to your print
- Foil blocking: Metallic, foil finishes applied with a heated stamp
- Embossing: Raised textures applied to the material using heat
- Spot UV: A glossy finish applied to specific areas on the print
-
by Esteban T
-
by Dan Newman
-
by IleanaP


Want to learn more?
Inspiration
Tips
You may also be interested in…